This post may contain affiliate links, which means I’ll receive a commission if you purchase through my links, at no extra cost to you. Please read full disclosure for more information
Why I Love My Woodshop (And How to Make a Custom Name Sign)
One of the biggest reasons I love having a woodshop is the ability to customize things around my home. Whether it’s a shelf, a sign, or a fun project, being able to create something unique and special for my family—especially my kids—means everything to me.
There’s something powerful about making something just for them, something that has their name on it. It might seem small, but a simple name sign speaks volumes. It tells them they are loved, they are seen, and that they belong. That’s the kind of home I want to build—one where my kids always feel comfortable being exactly who they are.
Why I Share This
When I first started woodworking, I had a hard time figuring out how things were made. I’ve always been naturally curious, and I wanted to see the process—not just the finished product. So whether you’re here because you’re curious too, or because you want to try making one of these name signs yourself, you’re in the right place.
In this post, I’ll walk you through every step, and share the tips and tricks I’ve picked up along the way. And if you get to the end and decide you’d rather order one instead, that’s totally okay—I’ll include a link for that too.
Step 1: Cut Your Circle
I use ½ inch plywood and cut my circle with a CNC router, but there are several ways to get this done:
- Router and circle jig: This is what I used before I had a CNC.
- Jigsaw and template: You can draw your circle on the plywood and cut it out by hand.
No matter what tool you have, don’t let that stop you. The important thing is that you start.
Step 2: Sand and Stain
After cutting the circle, give it a good sanding—get it smooth and the important thing is to get all the pieces that could catch on anything sanded. Then it’s time to stain.
For this project, I used Minwax Early American. Follow the instructions on the can, but in general: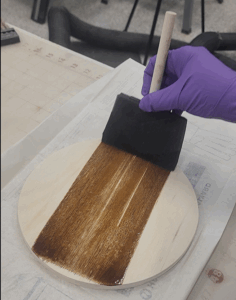
- Apply stain evenly.
- Wipe off any excess.
- Let it dry completely before moving on.
Step 3: Prepare the Name Cutouts
For the name, I use 1/16 basswood. I like to paint or stain the wood before cutting, especially when using delicate fonts. You have a few options here: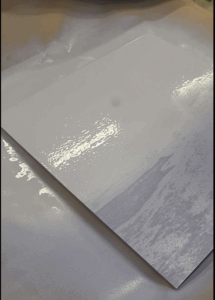
- Stain (like the back piece)
- Brush-on paint
- Spray paint (my favorite)
 For this example, I used a beautiful French Lilac spray paint from Rust-Oleum. After the first coat dries, I give it a light sanding with high-grit sandpaper to knock down any fuzzies that come up from painting wood. Then I apply a second coat.
Step 4: Design and Cut
I use Lightburn Software to design my layout—it’s fast, easy to use, and works with all my lasers.
Once I have the name and layout set:
- I send it to the laser and let the machine do its magic.
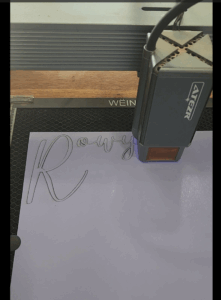
- I engrave a middle or last name on to the back piece.
- I also engrave an outline onto the circle backing so I know exactly where the name should go when gluing.
- Its also helpful to keep the scrap that was used to cut out the circle so that you can test your settings on your laser and dial them in perfectly.

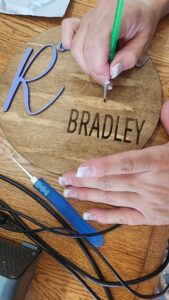
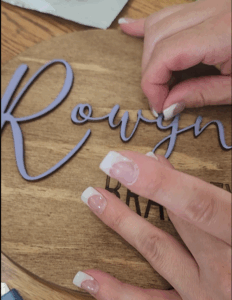
Step 5: Assemble the Sign
Now that everything is cut and ready, it’s time to assemble.
- I use CA Glue to attach the name to the back piece.
- A tiny paintbrush helps me apply the glue precisely inside the engraved outline.
- Then I carefully place the cutout name on the glue and press gently.
- The CA Glue comes with an activator which is great for other projects, however for this project I don’t use the activator.
 Done! Your Custom Name Sign Is Ready
And there you have it—a beautiful, personalized name sign that your little one will treasure. I hope this guide was helpful, whether you’re making your first sign or just came to see how it’s done.
If you’d rather skip the tools and let me make one for you, here’s the link to order your custom sign: Click Here
And remember:
Create the life you can’t wait to wake up to.

26 Responses
https://shorturl.fm/3VZ8g
kuhjsz
wqe74j
704rlh
https://shorturl.fm/Amn3c
https://shorturl.fm/ZmIf7
https://shorturl.fm/rBq5L
https://shorturl.fm/AOnID
https://shorturl.fm/ZFCsh
https://shorturl.fm/j1pQB
xjajnz
sony57
zhlo0f
https://shorturl.fm/DDLZj
https://shorturl.fm/pp7ZZ
rh6nft
lz4bmb
https://shorturl.fm/FrotH
https://shorturl.fm/nll30
https://shorturl.fm/Khjvv
https://shorturl.fm/ZSzRj
https://shorturl.fm/FcVPB
https://shorturl.fm/wc5ep
7efehd
4dk8hb
https://shorturl.fm/HIEO4